I didn't get much done this week, just working on the shading and bases on the Germans and preparing some GZG starship minis for painting. I'll get pictures next week.

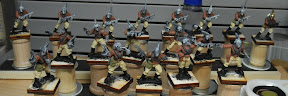
I've almost finished the Zeppelin Troopen soldiers. I need to do some highlighting, and a wash on the exposed skin, and work up the bases.


Painting was pretty straightforward. Charcoal grey uniforms, black boots, reddish brown for the leather, etc. I pulled out a new trick for the goggle rims. The lenses are light grey, with sky blue "reflections". I colored the frames using a Tombow pen with a brush tip. The very fine tip of the brush pen let me get just the edges of the frames without straying (much), and because it's a pen, I don't have to worry about paint consistency or overloading a brush. I bought the pens for edging on paper models like the Hummingbird, but I'm glad I had them around for this. There's a recent thread on TMP about using pens for outlining, and I'll have to see if these will be useful elsewhere.

I spent much of the week building walls for Saturday's game... which didn't get used, because we rearranged things at the last minute and didn't need them. That's ok, I figured out enough throwing these together to do up a lot of them for later games.
The first set of walls were made from cork. I just cut 2" wide strips from a (almost) 12"x12" piece of cork tile and glued them onto 1" wide bases of hardboard, then worked the bases up with some filler. I painted them sand, then drybrushed with a cream color.
 (click for a larger picture)
The second set of walls were more complicated. I wanted to get some relief and structure in them, so I drew up some facings in a cad program (cadstd, a cheap and decent program for simple stuff like this) and printed them out on cardstock. One set of facings had rectangular openings, the other had arched openings. I carefully cut these out, then after a few I quit trying to be careful. :)

I glued the arched facings onto a piece of foamcore, then glued the rectangular facings over them. I glued each 2"x9.5" wall section to a hardboard base, then glued a half-inch balsa pillar at one end to make 10" sections. A quick coat of paint and they were usable. When I do these again, I want to put stonework on the tops of the walls and dress up the end pillars.
For this week, it's the Zeppelin troopen (again) and gladiators you can see in the background.
The first set of walls were made from cork. I just cut 2" wide strips from a (almost) 12"x12" piece of cork tile and glued them onto 1" wide bases of hardboard, then worked the bases up with some filler. I painted them sand, then drybrushed with a cream color.
(click for a larger picture)The second set of walls were more complicated. I wanted to get some relief and structure in them, so I drew up some facings in a cad program (cadstd, a cheap and decent program for simple stuff like this) and printed them out on cardstock. One set of facings had rectangular openings, the other had arched openings. I carefully cut these out, then after a few I quit trying to be careful. :)
I glued the arched facings onto a piece of foamcore, then glued the rectangular facings over them. I glued each 2"x9.5" wall section to a hardboard base, then glued a half-inch balsa pillar at one end to make 10" sections. A quick coat of paint and they were usable. When I do these again, I want to put stonework on the tops of the walls and dress up the end pillars.
For this week, it's the Zeppelin troopen (again) and gladiators you can see in the background.
When I started painting up the Zeppelin troops, I discovered that the gesso had left a lot of bubbles and webbing, probably because the bottle was mostly empty and had dried out a bit. Fortunately, I've got a new bottle waiting. So they went in the drink (Simple Green) for a bit, spent some time under a brush, and are ready to be rebased and primed again.
That's life, I guess. I've been getting some other things ready to paint as well.
That's life, I guess. I've been getting some other things ready to paint as well.
This week I've been finishing up an old project, some more bocage for Crossfire, while getting my Pulp Figures zeppelin troopen ready for painting.

These were built as shown on This Very Blog. It's a quick and straightforward method, and looks good on the tabletop.
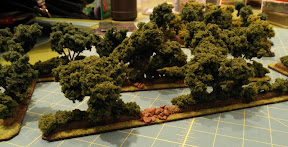
Balsa wood, sand and small rocks, Woodland Scenics trees and clump foliage, and GW static grass.
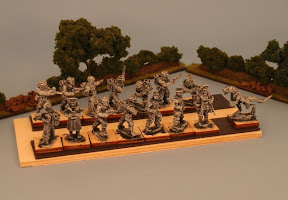
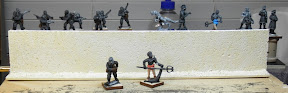
The zeppelin troopen are great figures, easily cleaned up. Here I've done my usual prep: black gesso for primer, followed with a heavy white drybrush.

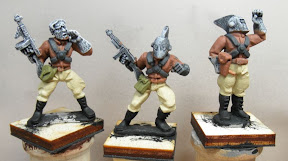
Converting this guy was quite fun. When I looked at the guy on the top left here, he looked to me like a big burly type who should be lumbering around the battlefield firing a machine gun from the hip. So I took the guy on the right here, and hacked the gun out of his hands. I took an extra Maxim I had laying around and cut it down a bit to fit. Then I cut off their heads (muttering "Ach! Mein Kopf!" all the while, of course) and glued them on each others' bodies.

These were built as shown on This Very Blog. It's a quick and straightforward method, and looks good on the tabletop.
Balsa wood, sand and small rocks, Woodland Scenics trees and clump foliage, and GW static grass.
The zeppelin troopen are great figures, easily cleaned up. Here I've done my usual prep: black gesso for primer, followed with a heavy white drybrush.
Converting this guy was quite fun. When I looked at the guy on the top left here, he looked to me like a big burly type who should be lumbering around the battlefield firing a machine gun from the hip. So I took the guy on the right here, and hacked the gun out of his hands. I took an extra Maxim I had laying around and cut it down a bit to fit. Then I cut off their heads (muttering "Ach! Mein Kopf!" all the while, of course) and glued them on each others' bodies.
The past week I've been building another papercraft model, this time a Hummingbird attack skimmer for one of my 15mm scifi forces.
The model is designed to a 25mm (1/60) scale. To build it in 15mm scale, I simply scaled the print to 60% and printed it on photo paper that I cut down to 5.5" x 8.5". After that, I built it like normal. I found that the existing glue tabs did not work well at this size, but cutting off the existing glue tabs and making new ones from colored paper worked out fine. Some pieces ended up a little fiddly and hard to put together, especially the engine thrusters and intakes and the chin gun and sensor pods.
(Click on the images for larger pictures.)
The model is very lightweight. I was going to glue a washer inside the hull to give it some heft, but I forgot. The file includes patterns to make a flying stand, which I'll put together after I find the necessary transparency sheets. I am planning to glue that washer to the bottom of the model, and stick some magnetic sheet to the top of the stand so the model is easily removable.
No in progress shots, but here are the tools I used to cut out and build the model.
I did my cutting on a glass cutting board. That self-healing mat is under the glass, and I only put it there to give me some contrast for the brown bits of paper I was using for tabs. The white tool is a bone folder, used to crease the cardstock without cutting it. This lets the heavy paper bend much easier and in a more controlled manner; just drag it across a fold line like it is a knife.
The cutting was done with a snap-blade utility knife. Cutting on the glass goes through blades pretty quickly, and these are cheap but still sharp enough to get a good cut. The sculpting tool next to it I used to apply glue, and I used the tweezers to hold fiddly pieces while gluing and to clamp glue joins together until it set. I used the pen (and another brown one) to color exposed paper edges and the backs of pieces so the white bits don't show through.
At the top of the picture you can see leftover paper I used to make glue tabs. I just cut a 1/8" strip of paper, folded it in half lengthwise, and colored one side with a pen. I measured a join edge, cut the paper to length, then cut off the corners as needed so it would fit properly.
I glued it up with regular pva (Elmer's) glue. the blobs at the top right of the cutting board are where I dabbed small drops of glue before using the sculpting tool to apply them to the cardstock.
The model is designed to a 25mm (1/60) scale. To build it in 15mm scale, I simply scaled the print to 60% and printed it on photo paper that I cut down to 5.5" x 8.5". After that, I built it like normal. I found that the existing glue tabs did not work well at this size, but cutting off the existing glue tabs and making new ones from colored paper worked out fine. Some pieces ended up a little fiddly and hard to put together, especially the engine thrusters and intakes and the chin gun and sensor pods.

(Click on the images for larger pictures.)


The model is very lightweight. I was going to glue a washer inside the hull to give it some heft, but I forgot. The file includes patterns to make a flying stand, which I'll put together after I find the necessary transparency sheets. I am planning to glue that washer to the bottom of the model, and stick some magnetic sheet to the top of the stand so the model is easily removable.
No in progress shots, but here are the tools I used to cut out and build the model.

I did my cutting on a glass cutting board. That self-healing mat is under the glass, and I only put it there to give me some contrast for the brown bits of paper I was using for tabs. The white tool is a bone folder, used to crease the cardstock without cutting it. This lets the heavy paper bend much easier and in a more controlled manner; just drag it across a fold line like it is a knife.
The cutting was done with a snap-blade utility knife. Cutting on the glass goes through blades pretty quickly, and these are cheap but still sharp enough to get a good cut. The sculpting tool next to it I used to apply glue, and I used the tweezers to hold fiddly pieces while gluing and to clamp glue joins together until it set. I used the pen (and another brown one) to color exposed paper edges and the backs of pieces so the white bits don't show through.
At the top of the picture you can see leftover paper I used to make glue tabs. I just cut a 1/8" strip of paper, folded it in half lengthwise, and colored one side with a pen. I measured a join edge, cut the paper to length, then cut off the corners as needed so it would fit properly.
I glued it up with regular pva (Elmer's) glue. the blobs at the top right of the cutting board are where I dabbed small drops of glue before using the sculpting tool to apply them to the cardstock.
Well, looks like I failed in that whole "post every month" thing. Based on the idea that "If I can't clear my height, why can't I clear one inch above my own height" (thanks Bill), let's see if I can manage a post every week instead.
I've got a few things in the project queue for this year. As mentioned before, I'm planning to run a pulp game for Bayou Wars this year. For that I need to acquire and paint more figures (I want 15-20 figures per player, divided in 2-3 squads each), and make a lot of terrain.
I'm working on some Ebbles Miniatures vehicles and ground equipment to go with my 15mm sci-fi. The pieces are actually 25mm scale; the miracle of print-your-own lets me rescale it to 60% to match my figures.
I've also got a secret project. I am calling it "Highway Robbery", and I'll let people guess what it might be as progress develops. If it's done in time, I'll run it as a Sunday brain-dead game at Bayou Wars.
I didn't make it, too much else I had to do today. But all that is left are some washes and highlighting, and cleaning up the rocket packs and painting those. It shouldn't take long to do that tomorrow. Maybe I can claim Thursday didn't count. :p


No work done yesterday, I spent the evening playing operation on my computer and then reinstalling everything. What fun.
Today, I painted up the harnesses for the rocket packs in Ceramcoat "Charcoal", ammo pouches for the SMGs in Timberline Green, and pistol holsters in Autumn Brown same as the jackets.
Tomorrow is my last day. Hopefully I can get gloves, weapons, helmets and the occasional bare head, plus some washes and highlighting, done in one day. We'll see.
No pictures today, computer problems. You will have to imagine an even coat of paint on the pants and boots. Hopefully I'll have the computersorted out tomorrow.